As you might have guessed writing is a huge part of my life. I have a lot of different techniques that I use while writing to help focus and help keep from getting writers block. One of those techniques is listening to a specific genre of music. I love music and I don't listen to any specific genre on an everyday basis. Except for when I am writing. When I am writing I tend to listen to more hard rock/punk rock/screamo kind of music because I find that it calms me. (I know that may seem weird but I do find loud rock/screamo music very calming).
So I have compiled a list of some of my favorite songs to listen to while I am writing. These are only some of the songs I listen to and this is definitely not a compete or final list and it is not in any sort of order.
Feeling Thing - blink 182
Sugar, We're Goin Down - Fall Out Boy
First Date - blink 182
This Is Gospel - Panic! At the Disco
I'm Not Okay (I Promise) - My Chemical Romance
Basket Case - Green Day
Dear Maria, Count Me In - All Time Low
I Write Sins Not Tragedies - Panic! At The Disco
The Anthem - Good Charlotte
In Too Deep - Sum 41
You're Gonna Go Far, Kid - The Offspring
Ocean Avenue - Yellowcard
Welcome To The Black Parade - My Chemical Romance
Swing, Swing - The All-American Rejects
Hands Down - Dashboard Confessional
Lifestyles of the Rich & Famous - Good Charlotte
My Own Worst Enemy - Lit
Dammit - blink-182
Stacy's Mom - Fountain Of Wayne
Grand Theft Autumn / Where Is Your Boy - Fall Out Boy
The Middle - Jimmy Eat World
Scotty Doesn't Know - Lustra
When You're Around - Motion City Soundtrack
Adam's Song - blink-182
99 Red Balloons - Goldfinger
I'm Just A Kid - Simple Plan
This Ain't A Scene, It's An Arms Race - Fall Out Boy
Just A Girl - No Doubt
Cute Without The "E" - Taking Back Sunday
Bored to Death - blink-182
Prayer Of The Refugee - Rise Against
Fat Lip - Sum 41
The Kill (Bury Me) - Thirty Seconds To Mars
All The Small Things - blink-182
MakeDamnSure - Taking Back Sunday
Tuesday, May 17, 2016

Friday, May 13, 2016
New Food Friday: Spinach and Pine Nut Salad
Welcome to my first New Food Friday! Where there will be a new recipe every Friday for not just me to try but I will also be sharing my experience and the recipe with you for you to try out! This week I tried a spinach and pine nut salad. The recipe is very specific but it did leave a lot of room to make changes and adjust for your own taste which is exactly what I did. I decided not to try the bread crumb topping portion of the recipe but at some point I do hope to come back and try it out. I salad was amazing. I didn't use the exact portion sizes because I was making one for myself and not 4 people, so in the end the dressing was a little to oily and not as sweet as I would've hoped.
Makes 4 servings
Prep time: 15 minutes
Cook time: 10 minutes
What you Need:
What to Do:
Energy: 270kcals/1124kJ
Protein: 6g
Fat: 19g
Saturated Fat: 2g
Carbohydrate: 17.5g
Sugar: 9.5g
Fiber: 4g
Salt: 0.8g
Recipe from:
The Gluten-Free Cookbook By Heather Whinney, Jane Lawrie, and Fiona Hunter.
Find me HERE
Makes 4 servings
Prep time: 15 minutes
Cook time: 10 minutes
What you Need:
- 9oz (250g) baby spinach leaves
- handful of juicy raisins (optional)
- 3 1/2oz (100g) sun-dried tomatoes, roughly chopped
- 1 3/4oz (50g) pine nuts, toasted
- (I also used dried cranberries which were delicious)
- 3 tbsp extra virgin olive oil
- 1 tbsp orange juice
- pinch of sugar
- salt and freshly ground black pepper
- 2-3 slices of (gluten-free) bread, torn
- pinch of dried chili flakes
What to Do:
- For the dressing, mix the ingredients together in a bowl, taste, and adjust the seasoning as needed. Set aside. Preheat the oven to 400 degrees F (200 degrees C).
- For the bread crumb topping, put the bread in a food processor and pulse to form crumbs. Pour the crumbs into a roasting pan and bake for 5-10 minutes, or until golden. Don't let them brown. Stir the chili flakes and salt and pepper into the crumbs. Set aside.
- To assemble the salad, pour the dressing into a large salad bowl and swirl it around. Add the spinach leaves and shake so they get coated. Add the raisins (if using) and sun-dried tomatoes and toss gently. Top with the pine-nuts, sprinkle the bread crumbs over the top, and serve.
Energy: 270kcals/1124kJ
Protein: 6g
Fat: 19g
Saturated Fat: 2g
Carbohydrate: 17.5g
Sugar: 9.5g
Fiber: 4g
Salt: 0.8g
Recipe from:
The Gluten-Free Cookbook By Heather Whinney, Jane Lawrie, and Fiona Hunter.
Find me HERE
Tuesday, May 10, 2016
My Tattoos and Why They Mean so Much to Me
I got my first tattoo when I was 18. I went with some of my friends and I didn't need to think hard about what I wanted. I got a small treble clef behind my left ear. For my first tattoo this was the most obvious thing for me to get. Music is the most stable thing in my life. Everything was constantly changing and I was getting really good at handling change but when I needed to be brought down to reality music is always there. I was in choir for 13 years during school and I'm not sure I could have gotten through some days without it. I can't see my tattoo because it is behind my ear but every time someone points it out or talks about music I think about it and how much music has impacted my life.

I got my second tattoo only a few weeks after I got my first one. My second tattoo I had planned out for two years before I could get it done. The design of it had transformed in various different ways over the two years until I had designed the perfect one for me. The tattoo is lyrics from my favorite song from one of my favorite bands. The song is "Sanctuary" by Paradise Fears. The lyrics say "Even Broken Wings Can Fly Away" and next to the lyrics I have the bands logo that they call the "warrior heart." These lyrics are my favorite from the song and have always stuck out to me. To me the lyrics mean that no matter what happens to me I will always be okay, and that even though I've been through difficult times I can still follow my dreams and goals. Whenever I am struggling with ambition or change I look at my tattoo and remember that I can do whatever I put my mind to.

My third tattoo I got as a message to myself that no matter what other people say being myself will always be more rewarding than hiding just to fit societies standards and that there will always be people who love me regardless of what I do, who I love or how I identify myself. The tattoo is lyrics from Walk the Moon's song "Different Colors", the lyrics say "we carry each other" and are written in the lead singer, Nick Petricca's, hand writing. The song was originally written as a fight song for the LGBTQ+ society but the song was released as a single the same time congress declared that gay marriage is legal in all 50 states and the song turned into an anthem. The song first came out on Walk the Moon's, Talking is Hard, CD around the same time I was first questioning my gender and sexuality and I latched myself onto the song. It was the only song I listened to for month's straight. When I came to terms with my sexuality my roommate at the time knew how much the song meant to me and came up with the idea for the tattoo. Everyday I look down at my collar bone and see those words written out and remember that I am truly not alone.
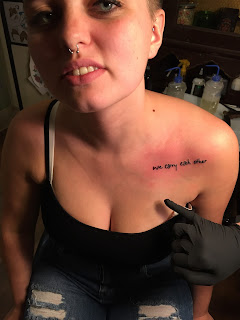 My most recent tattoo I got on December 12, 2015. I remember the exact date because I got the roman numerals for the date December 6, 2015 tattooed right underneath my "we carry each other" tattoo. That date is significant to me because that is the day I came out as bisexual and gender fluid not only to my friends and family but to the world. This was such a huge step for me. I had basically came out to everyone all at one time and there was no going back, but once I did I felt instantly relieved like the biggest weight had been lifted off of me. I no longer have to hide behind a wall pretending to be someone I'm not. Everyday I get to look at the date that I took that huge step that has changed me and my life.
 I adore all of my tattoos and their stories, I always sit anxiously for someone to ask me about them so I can talk about them. I'm looking forward to getting more because tattoos are one of the best ways to express yourself while leaving a piece of your history on you as a remembrance.

I got my second tattoo only a few weeks after I got my first one. My second tattoo I had planned out for two years before I could get it done. The design of it had transformed in various different ways over the two years until I had designed the perfect one for me. The tattoo is lyrics from my favorite song from one of my favorite bands. The song is "Sanctuary" by Paradise Fears. The lyrics say "Even Broken Wings Can Fly Away" and next to the lyrics I have the bands logo that they call the "warrior heart." These lyrics are my favorite from the song and have always stuck out to me. To me the lyrics mean that no matter what happens to me I will always be okay, and that even though I've been through difficult times I can still follow my dreams and goals. Whenever I am struggling with ambition or change I look at my tattoo and remember that I can do whatever I put my mind to.

My third tattoo I got as a message to myself that no matter what other people say being myself will always be more rewarding than hiding just to fit societies standards and that there will always be people who love me regardless of what I do, who I love or how I identify myself. The tattoo is lyrics from Walk the Moon's song "Different Colors", the lyrics say "we carry each other" and are written in the lead singer, Nick Petricca's, hand writing. The song was originally written as a fight song for the LGBTQ+ society but the song was released as a single the same time congress declared that gay marriage is legal in all 50 states and the song turned into an anthem. The song first came out on Walk the Moon's, Talking is Hard, CD around the same time I was first questioning my gender and sexuality and I latched myself onto the song. It was the only song I listened to for month's straight. When I came to terms with my sexuality my roommate at the time knew how much the song meant to me and came up with the idea for the tattoo. Everyday I look down at my collar bone and see those words written out and remember that I am truly not alone.


Tuesday, May 3, 2016
DIY Bulletin Board
I have recently found a very cool way to make DIY bulletin boards. Bulletin boards are one of my favorite things. You get to display everything you do, concert tickets, pictures, bracelets, and other memorabilia. It is also a great place to hang your jewelry like necklaces and bracelets that you wear all the time or even pin notes as reminders.
What you Need:
What to Do:
What you Need:
- Canvas Board (any size)
- acrylic paint
- paint brushes
- push pins
- easel/newspapers
- cup of water
- paper plate
- any other crafts you would want to put on the board (optional)
- nails
- hammer
What to Do:
- Take your easel or newspaper and get your station set up. Get your cup of water and a plate for you to put the paint that you want on. You don't want to have to be scrambling trying to find what you need while you have wet paint.
- Paint the canvas whatever color(s) you have chosen. Let that dry and paint any additional coats as desired. Make sure the paint is dried completely before hanging.
- Clean your paint brushes thoroughly.
- Take your hammer and nails and measure your painted canvas board to where you would like to hang it. Hammer a nail into the wall (or whatever desired way of hanging the board).
- Use your push pins and start hanging up whatever you please and enjoy your DIY Custom Bulletin Board!
Tuesday, April 26, 2016
Gluten Free Chocolate Chip Cookie Recipe
One of my favorite thing in the whole world is chocolate chip cookies. When I went gluten free one of the first things I did was look up a good chocolate chip cookie recipe for when I need to bake and binge. This is my all time favorite gluten free chocolate chip cookie recipe.
Makes: approximately 14 cookies
Prep: 10 minutes
Cook: 15 minutes
Freeze: 3 months
What You Need:
8 tbsp unsalted butter, softened 1 tsp baking powder
2/3 cup granulated sugar 1/2 tsp salt
1 large egg 1/3 cup gluten-free rice flour
1 tsp pure vanilla extract 3oz (85g) chocolate chips, or chocolate broken into
1 1/4 cups gluten-free all-purpose flour small chunks
1) Preheat the oven to 375 degrees Fahrenheit (190 degrees Celsius). Line the baking sheets with parchment paper.
2) Cream together the butter and sugar until fluffy, using an electric whisk. Add the egg and vanilla and whisk again.
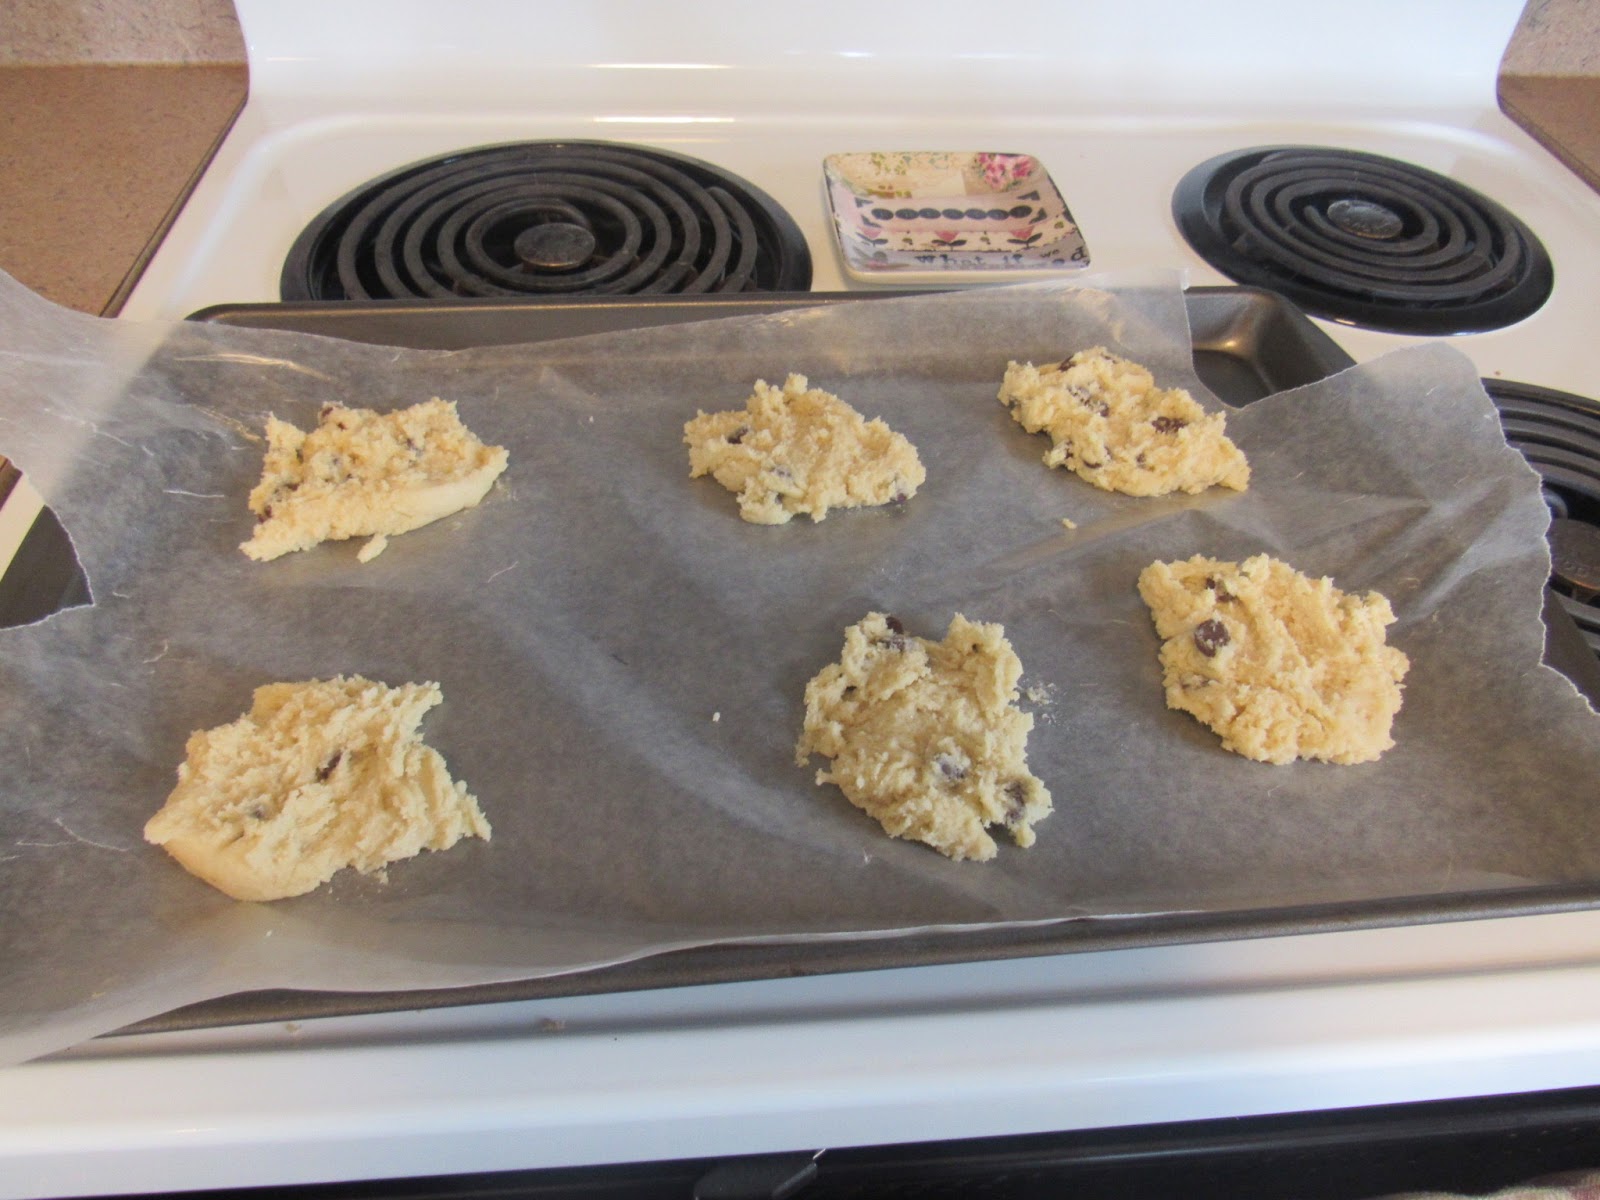
 3) Sift the flours, baking powder, and salt into the mixture, add the chocolate chips, and mix well with a wooden spoon. Heap 14 tablespoons of the mixture onto the prepared baking sheets; place them well apart since they will spread as they bake. Flatten them with your fingertips. I only made 12 with mine so they would fit comfortably on two of my cookie sheets at the size I wanted them.


4) Bake for 15 minutes or until golden brown. Use a metal spatula to transfer the cookies to a wire rack and leave until cold. Don't worry if the cookies are soft when you take them out of the oven; they crisp as they cool.

 The cookies taste amazing. This recipe is my favorite gluten free chocolate chip cookie recipe that I have found. Most recipes that I have come across the cookies have turned out dry and crumby. This one is very moist and does not crumble into your hand when you take a bite.
Statistics Per Cookie:
Energy: 204kcals/858kJ
Protein: 2.3g
Fat: 9g
Saturated Fat: 5.5g
Carbohydrate: 28g
Sugar: 16g
Fiber: 0.8g
Salt: 0.2g
Recipe from:
The Gluten-Free Cookbook By Heather Whinney, Jane Lawrie, and Fiona Hunter.
Find Me HERE
Makes: approximately 14 cookies
Prep: 10 minutes
Cook: 15 minutes
Freeze: 3 months
What You Need:
8 tbsp unsalted butter, softened 1 tsp baking powder
2/3 cup granulated sugar 1/2 tsp salt
1 large egg 1/3 cup gluten-free rice flour
1 tsp pure vanilla extract 3oz (85g) chocolate chips, or chocolate broken into
1 1/4 cups gluten-free all-purpose flour small chunks
1) Preheat the oven to 375 degrees Fahrenheit (190 degrees Celsius). Line the baking sheets with parchment paper.
2) Cream together the butter and sugar until fluffy, using an electric whisk. Add the egg and vanilla and whisk again.


4) Bake for 15 minutes or until golden brown. Use a metal spatula to transfer the cookies to a wire rack and leave until cold. Don't worry if the cookies are soft when you take them out of the oven; they crisp as they cool.


Statistics Per Cookie:
Energy: 204kcals/858kJ
Protein: 2.3g
Fat: 9g
Saturated Fat: 5.5g
Carbohydrate: 28g
Sugar: 16g
Fiber: 0.8g
Salt: 0.2g
Recipe from:
The Gluten-Free Cookbook By Heather Whinney, Jane Lawrie, and Fiona Hunter.
Find Me HERE
Sunday, April 24, 2016
All Time Drugstore Beauty Favorites
It is not any secret that I love make up. But after awhile finding good make up at an affordable price can be hard to do. At some points you may just want to give up and buy that expensive version that you know you will love but don't necessarily have the money for. At other times you will want to just grab the first thing off the drugstore shelf in the color you need without checking the brand just because you need something and you don't have the time or money to fool around looking for the right one that will fit your skin correctly. Admit it we've all been there.
Now I'm going to list some of my all time drugstore beauty favorites for you to check out. Maybe you already know and love these too or maybe you are new to make up and want a cheap start. Here is a list of my all time drugstore beauty favorites:
Rimmel London Lasting Finish 25 Hour Full Coverage Foundation

This foundation is so nice because it is a full coverage foundation but it doesn't feel like you are caking on layers of gooey stuff that will take hours to get off later. It is very easy to apply and my brush (I use the Real Techniques Retractable Kabuki brush ((also a drugstore find))) does not leave weird streaks on my face like other brush/foundation combinations have. You can find this product at any drugstore that sells Rimmel products. I get mine at Target or Ulta for around $7.99 USD.
Find Me HERE
Rimmel London Kate Moss Lip Balm in 01 Clear

This is the best lip balm I have ever found. There are so many different lip balms on the market now a days and it is so hard to tell which are going to work and which aren't. I was so happy when I found this one mostly because it was so cute and I figured no one would ask me to "borrow my lip balm" because it looks just like a lip stick. I tried it out not expecting much. Most lip balms wear off of me in a few minutes and I have to be constantly applying it. I definitely expected the same with this but I was totally wrong. It wears for so long no matter what you are doing. It does run out quickly if you use it as much as I do so I would say that is the only downfall of it. It is also new to the Kate Moss collection as of 2016 so I have only been able to find it at my local Ulta for $5.49 USD.
Find Me HERE
Maybelline Master Hi-Light by Facestudio Hi-Lighting Bronzer (Dupe for Hourglass Ambient Lighting Powder)

I found this highlighting bronzer through a dupe article when I was looking at articles for the Hourglass Lighting Powder. For anyone who may not know a dupe is when a product is in the same exact color and does the same exact thing just made by a different company and is cheaper. Now I was search for the Hourglass Lighting Powder for a while because I had heard a lot of really good things about it but I could not find it at any of the stores around me. When I found this dupe online I had to try it. I have fallen in love with this highlighting bronzer. I sweep a little all over my face right after my foundation and right before my contour/blush and I feel like it helps to set my foundation and give my face an all over finished look without too many different powders/cremes. You can find this at any drugstore that sells Maybelline but I have gotten mine at Ulta or Target for $9.99 USD.
Find Me HERE
Maybelline Vivid Matte Liquid Lipstick

This lipstick is amazing because it does not make your lips look dry like other matte lipsticks do. You have to like bright color lipsticks (I like a nice balance of bright and neutral) because they only come in bright/vivid colors but all of the colors are super pretty. The applicator is really nice and spongy and the container is nice and small like a regular lipstick would be. It doesn't seem like a lip gloss at all. That is the one thing I was afraid of the most because I do not like lip glosses. It is very smooth and dries really nicely. You can get them at any store that sells Maybelline but I have gotten mine at Ulta or Target for $7.99 USD.
Find Me HERE
Maybelline Color Sensational Lipstick

This lipstick is the brand that got me obsessed with lipstick as a small teenager many years ago. It has such a wide variety of colors and finish that you could literally spend hours in front of the section just staring at them. I have so many different colors and finishes from this brand that it is hard to differentiate anymore. It is such a great product because they are true to color, they go on easy and they stay on almost all day. I usually reapply after I eat no matter what lipstick I am wearing so I am not sure if it would last all day or not. You can get these at literally every drugstore. I get them everywhere for around $7.99 USD.
Find Me HERE
Maybelline The Colossal Volume Express Mascara

This is the brand of mascara I have been using since I started wearing make up. I have tried so many other brands but none of them compare to this one. I have extremely shaky hands and this applicator and wand make it extremely easy to put on my mascara where as a lot of other brands make it very difficult. The color is very bright and always true to color. It hardly clumps and the little it does I don't really mind because I have very long and curly lashes. I have never used a mascara curler in my life because I have never needed too so this very basic mascara works wonders for me. I get this at every drugstore and some stores sell it by the cash registers for around $6.99 USD.
Find Me HERE
Garnier SkinActive Micellar Cleansing Water

This is the best make up remover I have ever come across. I have never liked using make up remover wipes to take off make up because I always felt like they just pushed the make up into your skin/pours but I could never find a healthier alternative until I came across this. It is a make up removing water and face wash in one. The one thing I do not like about it is since I do wear a full coverage foundation it does not get it all off so I still use a Micellar Water based make up removing wipe to my face after I use this to take off my make up just to make sure all of my foundation is off; which usually it isn't. I have only been able to find this at Ulta for $8.99 USD.
Find Me HERE
Now I'm going to list some of my all time drugstore beauty favorites for you to check out. Maybe you already know and love these too or maybe you are new to make up and want a cheap start. Here is a list of my all time drugstore beauty favorites:
Rimmel London Lasting Finish 25 Hour Full Coverage Foundation
This foundation is so nice because it is a full coverage foundation but it doesn't feel like you are caking on layers of gooey stuff that will take hours to get off later. It is very easy to apply and my brush (I use the Real Techniques Retractable Kabuki brush ((also a drugstore find))) does not leave weird streaks on my face like other brush/foundation combinations have. You can find this product at any drugstore that sells Rimmel products. I get mine at Target or Ulta for around $7.99 USD.
Find Me HERE
Rimmel London Kate Moss Lip Balm in 01 Clear
This is the best lip balm I have ever found. There are so many different lip balms on the market now a days and it is so hard to tell which are going to work and which aren't. I was so happy when I found this one mostly because it was so cute and I figured no one would ask me to "borrow my lip balm" because it looks just like a lip stick. I tried it out not expecting much. Most lip balms wear off of me in a few minutes and I have to be constantly applying it. I definitely expected the same with this but I was totally wrong. It wears for so long no matter what you are doing. It does run out quickly if you use it as much as I do so I would say that is the only downfall of it. It is also new to the Kate Moss collection as of 2016 so I have only been able to find it at my local Ulta for $5.49 USD.
Find Me HERE
Maybelline Master Hi-Light by Facestudio Hi-Lighting Bronzer (Dupe for Hourglass Ambient Lighting Powder)
I found this highlighting bronzer through a dupe article when I was looking at articles for the Hourglass Lighting Powder. For anyone who may not know a dupe is when a product is in the same exact color and does the same exact thing just made by a different company and is cheaper. Now I was search for the Hourglass Lighting Powder for a while because I had heard a lot of really good things about it but I could not find it at any of the stores around me. When I found this dupe online I had to try it. I have fallen in love with this highlighting bronzer. I sweep a little all over my face right after my foundation and right before my contour/blush and I feel like it helps to set my foundation and give my face an all over finished look without too many different powders/cremes. You can find this at any drugstore that sells Maybelline but I have gotten mine at Ulta or Target for $9.99 USD.
Find Me HERE
Maybelline Vivid Matte Liquid Lipstick
This lipstick is amazing because it does not make your lips look dry like other matte lipsticks do. You have to like bright color lipsticks (I like a nice balance of bright and neutral) because they only come in bright/vivid colors but all of the colors are super pretty. The applicator is really nice and spongy and the container is nice and small like a regular lipstick would be. It doesn't seem like a lip gloss at all. That is the one thing I was afraid of the most because I do not like lip glosses. It is very smooth and dries really nicely. You can get them at any store that sells Maybelline but I have gotten mine at Ulta or Target for $7.99 USD.
Find Me HERE
Maybelline Color Sensational Lipstick
This lipstick is the brand that got me obsessed with lipstick as a small teenager many years ago. It has such a wide variety of colors and finish that you could literally spend hours in front of the section just staring at them. I have so many different colors and finishes from this brand that it is hard to differentiate anymore. It is such a great product because they are true to color, they go on easy and they stay on almost all day. I usually reapply after I eat no matter what lipstick I am wearing so I am not sure if it would last all day or not. You can get these at literally every drugstore. I get them everywhere for around $7.99 USD.
Find Me HERE
Maybelline The Colossal Volume Express Mascara
This is the brand of mascara I have been using since I started wearing make up. I have tried so many other brands but none of them compare to this one. I have extremely shaky hands and this applicator and wand make it extremely easy to put on my mascara where as a lot of other brands make it very difficult. The color is very bright and always true to color. It hardly clumps and the little it does I don't really mind because I have very long and curly lashes. I have never used a mascara curler in my life because I have never needed too so this very basic mascara works wonders for me. I get this at every drugstore and some stores sell it by the cash registers for around $6.99 USD.
Find Me HERE
Garnier SkinActive Micellar Cleansing Water
This is the best make up remover I have ever come across. I have never liked using make up remover wipes to take off make up because I always felt like they just pushed the make up into your skin/pours but I could never find a healthier alternative until I came across this. It is a make up removing water and face wash in one. The one thing I do not like about it is since I do wear a full coverage foundation it does not get it all off so I still use a Micellar Water based make up removing wipe to my face after I use this to take off my make up just to make sure all of my foundation is off; which usually it isn't. I have only been able to find this at Ulta for $8.99 USD.
Find Me HERE
Tuesday, April 19, 2016
Why College is not for Everyone
In our society it is stressed and pushed into teenagers minds that they NEED to go to college otherwise they will never live a happy life. Now if we were to look at it rationally sure if you want to be a doctor, lawyer or a business person, college would be the place to go and you probably already know that. But lets say you want to be an entertainer, writer, photographer, or even a business owner; now of course you could go to college and get more knowledge on all of these things but you wouldn't necessarily have to, and that is perfectly fine!
A big misconception is that in order to get a "good" job you need to have a college education and this may be true depending on what line of work you are going into but this is not true for everyone. We need to stop telling all teenagers that they need to go to college especially if in the end their college degree with be basically useless when they realize that what they want to do they didn't even need to go to college. Everyday people are finding ways to show companies that not having a college degree doesn't mean they aren't qualified to do the work they need to get done. A lot of the time it is very easy to get the qualifications for jobs through general life knowledge other than school work or job history.
Some times it is just hard for people to learn is classroom environments and it is a lot easier (and more fun) to experience and learn through life lessons. Learning through experience is one of the best ways for someone to learn especially if they have a hard time learning from someone talking at them or memorizing.
Every single person is different and sometimes we forget that. We definitely need to start realizing that our society is evolving daily. Every day things are changing and growing for the better including our education system and our workplaces.
A big misconception is that in order to get a "good" job you need to have a college education and this may be true depending on what line of work you are going into but this is not true for everyone. We need to stop telling all teenagers that they need to go to college especially if in the end their college degree with be basically useless when they realize that what they want to do they didn't even need to go to college. Everyday people are finding ways to show companies that not having a college degree doesn't mean they aren't qualified to do the work they need to get done. A lot of the time it is very easy to get the qualifications for jobs through general life knowledge other than school work or job history.
Some times it is just hard for people to learn is classroom environments and it is a lot easier (and more fun) to experience and learn through life lessons. Learning through experience is one of the best ways for someone to learn especially if they have a hard time learning from someone talking at them or memorizing.
Every single person is different and sometimes we forget that. We definitely need to start realizing that our society is evolving daily. Every day things are changing and growing for the better including our education system and our workplaces.
Subscribe to:
Posts (Atom)
-
Is flirting cheating? If you are in a committed relationship with another person is it considered cheating to flirt with someone else? To ca...
-
 I have been out for 6 months now. It seems crazy. It feels like just yesterday that I was trying to convince myself there was no way I could...
 -
 My favorite part of moving is decorating, making my space my own. I am an avid poster and wall decoration lover. It is weird for me to not h...